Setting Up Your Environment

Before we can get started in class, you will need to setup a few things on your computer. If something goes wrong during the semester, you may need to repeat some of these steps. If you have any trouble while installing please reach out on the class slack workspace.

Setup Your git Repo

We will use git to manage code in this class. This will be the way that you submit solutions to assignments and receive class code from the instructor. This step only needs to be performed ONCE for the semester. You will use the same git repo for all assignments and labs (except possibly the final project).

These instructions are designed for use on github.com. They may work using other git services, but for simplicity, only instructions for GitHub are provided. Please let the instructor know if you use a service besides GitHub.

  1. If you do not have one already, create an account on github.com 
  2. A template is provided for you to create your own repo. GitHub has an easy way to create your own repo in the form of this template. Go to: https://github.com/UML-EECE-5560/eece5560-base and click the green “Use This Temple” button.
  3. Name your repo using ONLY lowercase letters, numbers, and dashes. Make sure to set it to PRIVATE. You may name your repo whatever you like. Creating a private repo should be free. If GitHub tries to charge you, associate your university email address with your GitHub account and it should become an educational account.
  4. Share the repository with the instructor, username: paulrobinette

Now you have a place to store your code for the semester that only you and the instructor can see.

Installing Linux

It is highly recommended to use Linux in this class to complete the homework assignments and develop on the robot. Both Ubuntu 18.04 and Ubuntu 20.04 are supported by the current version of Duckietown software. Either should work, but the instructions in this guide assume you are using Ubuntu 18.04. If your computer cannot support this please reach out to the instructor. The only reason this step will need to be rerun is if your Linux install becomes corrupted (not very likely).

  1. First, you need to choose if you would like to run Linux by itself, as a dual boot system, or as a virtual machine (VM). Refer to the lecture to understand the difference.
  2. Regardless of your chosen install method, please ensure that you have at least 2GB of RAM and 30GB of hard drive space available.
  3. If installing in a VM, there are guides for most of the major VM programs.
    1. VirtualBox (free option): https://linuxhint.com/install_ubuntu_18-04_virtualbox/
      NOTE: The Ubuntu 18.04 download link is incorrect, use this: https://releases.ubuntu.com/18.04/
      Make sure you install the guest additions package: https://www.ubuntu18.com/install-guest-additions-virtualbox-ubuntu-18/
    2. VMWare Workstation: https://linuxhint.com/install_ubuntu_vmware_workstation/
  4. If dual booting instead: this can be a little trickier but is still pretty easy. Tutorials are available for both Windows and MacOS base systems.
    1. Installing on a USB drive: https://linuxhint.com/run-ubuntu-18-04-from-usb-stick/
    2. Windows: https://www.itzgeek.com/how-tos/linux/ubuntu-how-tos/how-to-install-ubuntu-18-04-alongside-with-windows-10-or-8-in-dual-boot.html
    3. MacOS (somewhat difficult): https://linuxnewbieguide.org/how-to-install-linux-on-a-macintosh-computer/

Regardless of the method you chose, you should now have a Linux install ready to continue. This is a good time to work on a tutorial if you are unfamiliar with the Linux command line: https://ryanstutorials.net/linuxtutorial/

Setup Your Docker Workflow

The following commands are intended to be run from a Linux command-line terminal. Commands are tested in Ubuntu 18.04 and may need minor modifications to run in Ubuntu 20.04.

  1. Install docker on your system:
    $ sudo apt install docker.io

    You should only need to do this once on a Linux system.

  2. Add your username to the docker group:
    $ sudo usermod -aG docker ${USER}
  3. Install Duckietown Shell (dts). We will talk about this more in class when setting up the robots, but we are going to take advantage of a few features here to make setting up your laptop easier. Run these commands:
    $ sudo apt install -y python3-pip git git-lfs
    
    $ pip3 install --no-cache-dir --user -U duckietown-shell

    NOTES:

    1. NEVER use sudo to install dts! In general, never use sudo with pip3 at all.
    2. dts documentation: https://github.com/duckietown/duckietown-shell
    3. dts can be installed on MacOS as well with most features supported. Windows is not supported but may work.
    4. dts will likely need to be updated throughout the semester as changes are released. Rerun the pip3 command above whenever it needs to be updated.
  4. Reboot Linux (if in a virtual machine, only the VM needs to be rebooted)
  5. Set the dts version:
    $ dts --set-version daffy
  6. Run the following command to verify Docker is set up correctly:
    $ docker run hello-world

    You should see the following output:

    Hello from Docker!

    This message shows that your installation appears to be working correctly.
    If not, rerun steps 2 and 4.

  7. Finally, you shoud setup a personal access token so that the Docker website does not throttle your downloads in the lab.
    1. First, create an account on hub.docker.com
    2. Click on your username in the top right corner
    3. Select Security > New Access Token.
    4. Give your token any name you like and set permissions to “Read, Write, Delete”
    5. On your Linux install, run the following command and paste the token into your command prompt when it asks for a password:
      $ docker login --username <dockerhub username>

      Note that you will want to do this on your robot, too, when you install it.
      The above instructions were adapted from: https://docs.docker.com/docker-hub/access-tokens/

Setup Your git Repo

  1. Finally, we need to clone your git repo. You can find your repo URL on the top right of the page on GitHub. Click the green “Code” button and copy that URL, then run:
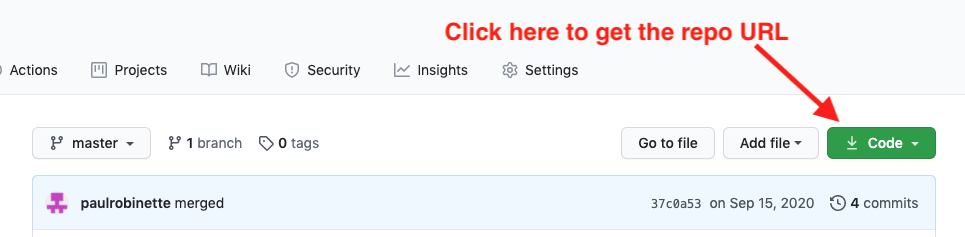
    $ git clone <repo_url>

    Note that this will clone your repo into your current folder as a new folder with whatever name you gave your repo on GitHub. You may need to clone your repo a few times in class. It is fairly easy to break your local copy, but it is even easier to download a fresh copy from GitHub and try again! Just run the clone command again.

  2. Change directory to your git repo:
    cd <your-git-repo-directory>
  3. We need to edit lines 2-4 in the “Dockerfile” here. All we want to do is update these lines with the name of your repo, your information, and a description. Note that this only needs to be done the first time you clone your repo or after you update to a new version of the template (this will be in another guide). The easiest way to edit the file is using gedit:
    $ gedit Dockerfile
  4. Now we need to commit and push our changes. First, let’s make sure git realizes we changed something:
    $ git status

    You should see that Dockerfile has changed.

  5. Now we need to tell git to add this file to the next commit:
    $ git add Dockerfile
  6. Then we will run the commit, including a short message that logs what we did:
    $ git commit -m "updated dockerfile"

    It is always a good idea to use a descriptive log message (the part in quotes after -m) so you keep track of when you made what changes. You can put whatever text you want inside the quotes.

  7. Now we need to push this to GitHub:
    $ git push origin master

    If you check your GitHub page after this step you should see a new commit with these changes to the Dockerfile.

Now you should be ready to proceed with assignments.