If you’re having a call with someone and want to bring more people into that discussion, Skype for Business makes that easy.
Click the Invite button in the upper right corner of your current call window:
Windows | Mac |
In the next window, either search for someone in the directory/your contacts, or enter a phone number:
Windows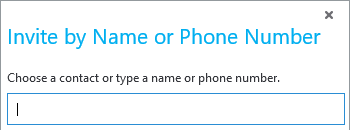 | Mac |
Double-click on the contact or phone number in search results. Skype for Business will call that person and add them into your current call. You can do this as many times as you wish to add more people.
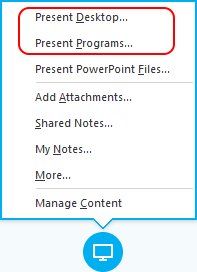
You can share your entire screen or a specific program to anyone using Skype for Business, and you can allow others to control your screen for increased collaboration. This is available from any IM or audio/video call. Click Present in the lower portion of the window and select the type of sharing you would like.
 Windows | 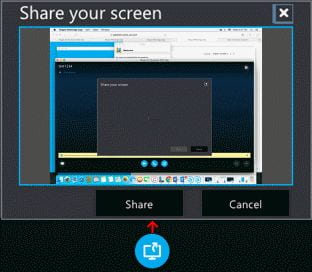 Mac |
Windows: Present Desktop will let you to can share anything on a specific screen while Present Programs will let you share a specific running program (i.e. Word, PowerPoint, etc).
Mac: You can share your entire screen.
A yellow border will surround whatever you are sharing as a reminder that it is being shared. You will also see options to stop sharing and to give control to others.
If you’re using a headset and you don’t have them on, you might not know someone is calling you. You can set Skype for Business to also ring your computer’s speakers on an incoming call – remember to turn up the volume on your computer’s speakers.
Windows: Click in the lower left corner of the main Skype for Business window and select Audio Device Settings.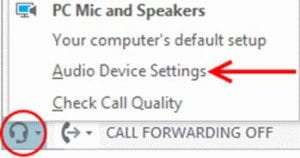
In the Secondary Ringer section, enable the checkboxes for Also ring and Unmute when my phone rings, then choose your computer’s speakers from the ‘Also ring’ drop-down menu.
Mac: Select Preferences from the Skype for Business menu, then choose your computer’s speakers from the ‘Ringing’ drop-down menu.
You can add a ‘personal note’ to your contact to provide info you want others to see. Click the “What’s happening today?” line above your name and type in whatever you want others to see. Remember to update it regularly. To remove a personal note, simply delete the text in that area.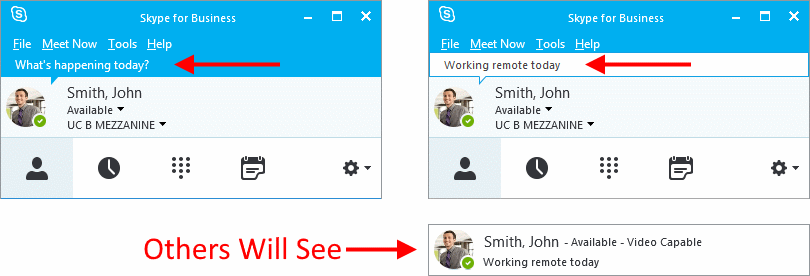
(On a Mac, click on your photo or the round area where your photo would be)
If you want to call or IM someone but they are offline, busy or on a call, right-click on their contact in Skype for Business and select Tag for Status Change Alerts. When that person’s presence changes to “Available”, you will see a pop up on your screen.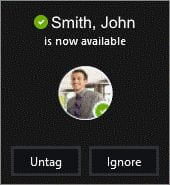
If you recently moved your computer somewhere new, you connected a new headset or you just want to make sure your audio is clear, you should test your setup to make sure everything is working just right. Click in the lower left corner of the main Skype for Business window and select Check Call Quality. This will make a test call where you can record a short message which will be played back for you.
(On a Mac, search for a special contact named “Audio Test Service” and call that contact)
Skype for Business meetings let you schedule a phone call but also share video, let everyone view a document, etc.
Note: Skype for Business is the recommended tool for administrative/business-related meetings. If you are scheduling academic/student-facing meetings, please use Zoom.
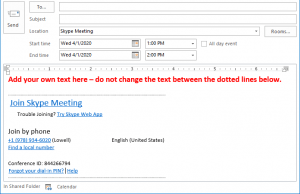
To schedule a Skype for Business meeting, start by open your calendar in Outlook.
Windows: Select the time you want the meeting to occur and click New Skype Meeting in the tool bar.
A new meeting window will open and you should set it up as you would any other meeting. Do not edit any of the text between the dotted lines.
Mac: Begin creating the meeting as you would normally, then click Online Meeting in the tool bar…
…and select Add Online Meeting: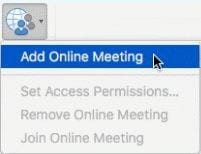
The meeting links and dial-in information will be added to your meeting window.
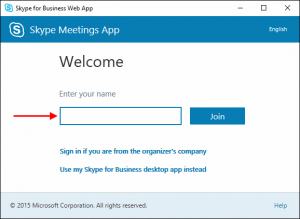
Guests from outside the university can attend Skype for Business meetings too. They can call the conference number from any phone and enter the Conference ID to dial in with audio. However, they can also attend and participate using the full suite of meeting functions using their computer audio, share their video, see video from other participants, see shared documents, etc. Here are the instructions for a guest (a PDF version is available too).